
Sometimes, typing and sending messages with attachments on your Mac is much faster and more convenient than doing it on your iPhone. A larger screen also makes it easier to view details in attachments like PowerPoint presentations or Excel spreadsheets. However, as time goes by, your Mac can become cluttered with tons of files and messages, including outdated or unnecessary ones. It’s important to regularly delete messages on your Mac to keep it running smoothly.
In the following section, you will find 6 effective methods, along with practical tips, to declutter and manage messages on your Mac effectively.
Table of Contents
- 1. Delete A Single Message or Conversation on Your Mac
- 2. Quickly Clear Message Attachments on Your Mac
- 3. Remove All Messages on Your Mac At One Time
- 4. Clear All Messages on Your Mac Using Terminal
- 5. Automatically Remove Messages on Your Mac
- 6. Disable Messages Sync on Your Mac from iCloud
- 7. Useful Tips and Tricks You Should Know
1. Delete A Single Message or Conversation on Your Mac
If you’re new to using your Mac, learning how to manage and delete messages on your computer may take a little while. Fortunately, deleting an individual message or entire conversation is straightforward once you know the steps. Follow the guide below to delete a single message or conversation from your Mac with ease.
1.1 Delete A Single Message on Mac:
Step 1. Open Finder > Applications > Messages on your Mac
Step 2. Open a conversation in the Messages app

Step 3. Find the message you want to delete, Control-click the text bubble you wish to delete, and choose Delete from the context menu.
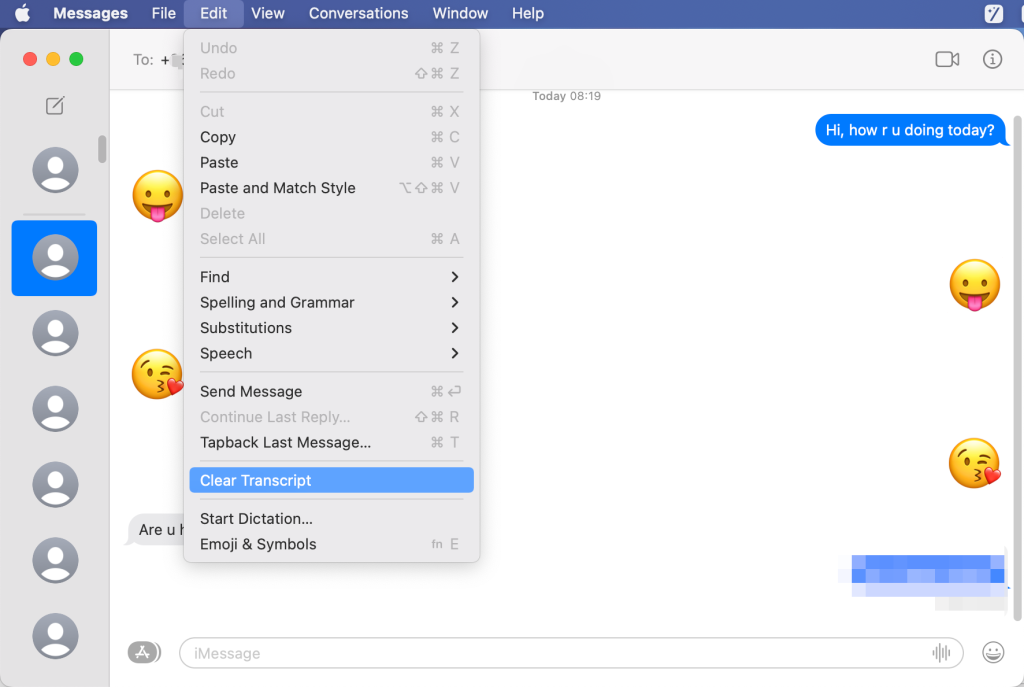
1.2 Delete A Conversation on Mac:
Step 1. Open Finder > Applications > Messages on your Mac
Step 2. Locate the conversation you want to delete

Step 3. Right-click on the conversation thread and choose Delete in the pop-up menu. Or click on the conversation > click Edit in the top menu bar > click Clear Transcript to clear conversations completely.
2. Quickly Clear Message Attachments on Your Mac
After deleting messages and conversations, attachments such as photos, videos, and documents may remain on your Mac. To free up storage space, you’ll need to remove these attachments separately. Here’s how:
Step 1. Open Finder > Click Go in the top menu bar
Step 2. Scroll down, Go to Folder > Copy and Paste “~/Library/Messages/Attachments” into the input box
Step 3. Drag the attachments to the Trash, or view the folders and clear them individually. Empty the trash and restart your Mac.
3. Remove All Messages on Your Mac at One Time
Want to quickly clear all messages or conversations on your Mac at once? While the Messages app doesn’t offer an option to select and delete all conversations at one time, there’s still an easy way to do it. Follow the steps below to remove all messages from your Mac quickly.
Step 1. Open Finder > Click on the Go menu and choose Go to Folder.
Step 2. Copy and paste this file path into the pop-up input box: ~/Library/Messages
Step3. Drag the files chat.db, chat.db-wal, chat.db-shm to Mac Trash.
4. Clear All Messages on Your Mac Using Terminal
Terminal is one of the powerful built-in utilities on Mac, making it easy to delete all your messages on your computer quickly and efficiently. With just a few simple commands, you can remove messages and attachments completely. Follow these steps below to go ahead:
Step 1. Go to Finder > Applications > Utilities > Terminal on your Mac
Step 2. Copy and paste these commands in the Terminal interface :
- To delete message conversations: rm –r ~/Library/Messages/chat
- To delete attachments: rm –r ~/Library/Messages/Attachments/
Step 3. Press Enter and all chat conversations and attachments will be deleted. These commands allow you to permanently remove everything you want without emptying the Trash.
Related Read: What is Terminal on Mac? The Ultimate Beginner’s Guide
5. Automatically Remove Messages on Your Mac
Manually deleting many messages and conversations constantly is truly terrible and time-consuming. Thankfully, Mac is designed with a feature that allows you to automatically delete messages after a certain period. It’s very handy when you don’t care about messages and would rather have your Mac do the tedious work without disturbing you. Here’s how to set up your Mac to automatically delete text messages on your Mac:
Step 1. Launch the Messages app on your Mac
Step 2. From the Messages Menu bar, head to Preferences
Step3. From the Keep Messages menu, you can select “after 30 days” or “One Year”, and your Mac will automatically delete messages after 30 days or one year. Or you have your Mac save your text messages forever.

6. Disable Messages Sync on Your Mac from iCloud
As you know, Messages from your Mac will only be saved to iCloud if you’ve allowed it. To check this setting, open the Messages app on your Mac, then go to the top menu bar and click Messages > Preferences > iMessage. Simply uncheck “Enable Messages in iCloud”, and your messages will be stored locally on your computer and will no longer sync with iCloud.
7. Useful Tips and Tricks You Should Know
Block Message Senders: If you no longer want to receive messages from certain senders, especially unwanted advertisements, you can block them instead of deleting their messages repeatedly. To do this, open the Messages app, click View in the top menu bar, select Block Person, and you will stop receiving messages from that sender.
Unsend Messages: If you need to unsend or edit a message you’ve already sent — and the recipient hasn’t seen it yet — you can easily recall it. Simply right-click the message you want to unsend, then select Undo Send. Please note: this feature only works for iMessages that must be unread within 2 minutes of sending, and it requires your Mac to run macOS Ventura (13) or later.